With ChatBot you can build a bot with no coding skills. It can provide round the clock support and take a thousand chats at the same time, giving your agents more time to work on difficult cases. What is more, bots can send rich messages and use 89����ô�� exclusive actions.
How to integrate 89����ô�� with ChatBot
When you add a ChatBot to 89����ô��, there are two possible paths. You can , log into the ChatBot panel, create a and, once your ChatBot is ready, connect it with 89����ô��. This workflow is described . You can also add new ChatBot agents right in the 89����ô�� app. Such workflow is described below.
Please note that Chatbot integration doesn’t work when manual routing is in use on the 89����ô�� account. Bots can’t take chats from a queue on their own.
Add a ChatBot agent in 89����ô��
You can add a new ChatBot agent from the 89����ô�� Agent app. To do so, log in to the 89����ô�� app and follow these steps:
1
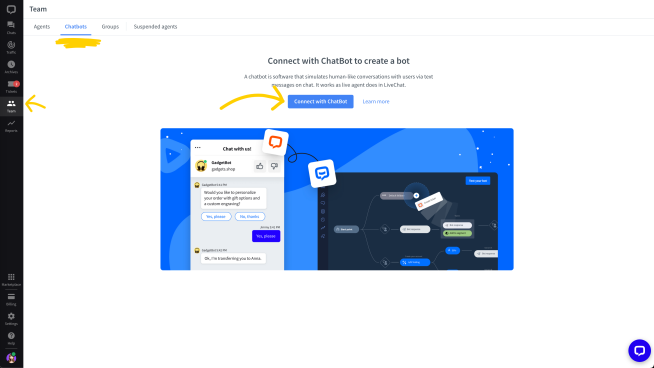
Go to the section in the 89����ô�� app and click on the Chatbots tab.
2
Select Add a chatbot.
3
Enter the name of your ChatBot in the pop-up modal.
4
Click on Connect with 89����ô�� to create your first chatbot and start your ChatBot trial.
5
Select a ChatBot you want to use. You can select one of the suggested , or choose to build your bot from scratch.
6
Once you have done that, click on Add chatbot.
7
Click on Manage in ChatBot. The ChatBot panel will open in a new tab.
8
The ChatBot panel will open on Integrations>89����ô��. You can edit your bot as well as its here. Click on Edit your bot to edit the details of your ChatBot.
9
Choose routing priority. There are two options: all chats go to bot first, or bot gets chats when no agent can take them.
10
Finally, click on Update bot.
That’s it! The bot is now ready to handle chats with customers. You can preview its performance and edit it in the Bots tab in the section.
The priority in the ChatBot panel is set for the General group in 89����ô��. Please see below on how to set up the bot priority for your other groups.
Assigning a bot to a group is done in the same way as assigning agents.
Please go to the section > Select Groups > Double-click on a group you want to edit > Add a bot to the agents list.
You can select your bot priority within a group using the priority field. In groups other than General, there are three priority levels to choose from:
Bot - all chats go to the bot first
Primary - bot is treated as a regular agent
Secondary - bot gets chats when no agent can take them.
You can follow our guide on how to edit groups and assign priority.
How bots work in 89����ô��
Here are a few basic rules bots live by:
they become one of your agents and if you are on our legacy ‘pay-per seat’ business model, bots take up a seat.
with the ‘all chats go to a bot first’ setting, by default every customer will chat with the bot. You can change this using the ‘remember recent agent’ option to connect returning customers directly with an agent.
they are able to transfer chats to human agents, and human agents can transfer chats back to the bot.
all conversations with a bot are archived both by ChatBot and 89����ô��.
89����ô�� exclusive bot actions
ChatBot integration with 89����ô�� provides you with a few exclusive features:
— redirect chats from the bot to agents.
— let the customer decide if they want to create a ticket that will be solved by a human agent.
Tickets mentioned in this article refer to the old 89����ô�� ticketing system available to new customers until June 1, 2023. If you’re using HelpDesk tickets, please refer to the . If you’re not,
The native Tickets feature will be sunsetted based on the following schedule:
Tickets mentioned in this article refer to the old 89����ô�� ticketing system available to new customers until June 1, 2023. If you’re using HelpDesk tickets, please refer to the . If you’re not,
The native Tickets feature will be sunsetted based on the following schedule:
— set a point in the story where a transcript of the conversation is sent to a predefined e-mail address.
— close the conversation when its final goal has been reached.
— let the bot tag chats.
— add goals to your scenarios to measure how well your bots are performing.
How to disable a bot
1
Go to the section in the 89����ô�� app and select the Chatbots tab.
2
Select ellipsis and then Disable chatbot.
That’s it, the bot has been disabled and all chats will be directed to agents. If you change your mind, you can enable it again, by Selecting the Enable button.
How to delete a bot
1
Go to the section in the 89����ô�� app and click on the Chatbots tab.
2
Select ellipsis and then Delete chatbot.
3
The ChatBot panel will open on Integrations>89����ô��. Click on ellipsis and on Delete bot.